pinterest

Sunday, December 29, 2013

Quick and Easy Christmas Card


Christmas is just around the corner and making a quick and easy card could never be easier!
Here is how I made my gatefold card.


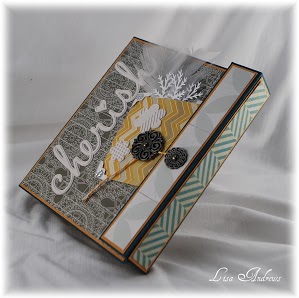
First I started with a piece of card stock 4" x 8", a piece of designer paper 3 3/4" x 3 3/4", a memory box die cut from a sparkly glitter paper and a piece of designer cut with Spellbinders Nestibilities Label 16 Die, my Scor-Pal, Scor-Tape and a sparkly gem from Stampin Up!


Score the card stock at 4" and 6" to create your gatefold. 


Next, cut the piece of designer paper in half so you have two pieces that are 1 7/8" x 3 3/4".  Attach them to the front of the card with Scor-Tape.  Add the Label, sentiment, Snowflake die and gem and you have a nice and easy Christmas card ready for the giving!


Thanks for stopping by and I hope you have a wonderful Holiday Season!!

Lisa


Monday, November 18, 2013

Scor-Pal and Magnolia-licious Blog Hop - Christmas Gift Tags


Today Scor-Pal is teaming up with Magnolia-licious for a spectular Christmas Blog Hop!  Did you know that the two companies are related?  That's right, Diana Crick, the creator of Scor-Pal also owns Magnolia-licious.  Combine the two together and you get major success!  I have to say that they pair lovely together, don't you think?

If you came here from the talented Cabio Tse

I have made two projects for today's blog hop.  First is a Christmas tag. 


My tag was created using Tilda Catching Stars Magnolia Stamp and Star Tag Magnolia Doo-Hickey.  I also used Memory Box Die.  The designer paper if from Farm House Paper Company.

For my next project I created a cute and whimsical "Countdown to Christmas"!


I used a Maya Roads Christmas Tree and attached a box behind it to hold all of the stars. The tag was created using a computer generated sentiment and Magnolia Doo-Hickey Dream Tag.  The star was made using the Magnolia Doo-Hickey Star Tag.  I cut 24 of them and stamped with numbers.


The box on the back was made using a piece of designer paper cut 4" x 5".  Using a Scor-Pal, line the 5" side up with the top and left fence, score at 2" and 3".  Lining the 4" side up with the top and left fence, score at 1" and 3". Assemble the box by cutting the 2" and 3" scored lined on the 5" side up to the 1" mark on each side of the 4" side.

I hope you enjoyed my projects today!  Make sure to check out the rest of the hop, everyone has cooked up some wonderfully creative projects!

Your next stop is the incredibly talented Janiel Corley

Your clue:  e and l

Lisa

Saturday, October 5, 2013

National Card Making Day! Halloween Hauntings

Hi everyone!  It has been so long since I posted anything but I am back and in the swing of things once again!  It feels so good to craft again!

Today is National Card Making Day, and I have a hauntingly happy Halloween card for you.  Here in Colorado it is cold and blistery so it is a perfect day to stay inside and get your craft on.


 I made a slightly altered Z-fold card and the use of my Scor-Pal made it a cinch to create!  I first created a Z-fold Card using a 6" x 12" sheet of cardstock, score at 3" and 6" to create the z-fold.  I then used a piece of 5" x 12" cardstock and scored at 6" to create the top flap and attached it to the right side of the card.


If you would like to see more uses for your Scor-Pal, head on over to the Scor-Pal Blog.  Today they are featuring cards made with a Scor-Pal.

Supplies:

black cardstock
Fancy Pants - Oct. 31st
Tilda With Spider
Magnolia sentiments
Magnolia Doo-Hickey Dies

I am so glad you stopped by!  Hope to see you again soon!

Lisa

Wednesday, April 3, 2013

Secret Little Box


Welcome!  Thanks for stopping by today!  Today I have created a Secret Little Box, inspired by THIS box by Norma Lee.  I just love little surprises and secret little hiding places, so I had a create a box that delivered both!  I hope you enjoy my tutorial.

Supplies:

Scor-Pal
Scor-Tape
Teresa Collins Designer Paper
bling
Tilda with Eggs by Magnolia
Memory Box Die
Magnolia Doo-Hickey, Hearts and Swirls and Butterfly
Card Stock

Copic Markers:
Skin:  E00, E21, E11, E23
Hair: E41, E42, E43, E57
Clothes:  BG0000, BG10, BG15, BG90

Here are all the pieces you will need for our box.

12" x 6" piece of card stock
(3) 4 7/8" squares of card stock
(2) pieces of 3" x 3" card stock

To create the drawers, using a 4 7/8" square of card stock, score 7/8" on each side.  Construct your drawer.


Next, we are going to create the base for our secret box.  Using the 12" x 6" piece of cardstock, score at 1 1/2", 4 1/2", 7 1/2" and 10 1/2".  Cut out the middle section, 4 1/2" to 7" 1/2" as shown below.


Attach the 3" x 3" pieces of card stock to your box as shown below.  I decorated the panels before attaching them. 
Next attach the drawers into place.  When attaching top drawer, be sure not to attach to the front panel, this is where it will tuck in to secure the box closed. 


Here are a couple more views


Thanks for coming by!  Happy Spring!

Lisa A.

Thursday, February 21, 2013

Heart Pocket Card


Hello!  I am so glad you stopped by today!  Today I am featuring my own little twist on the Flower Pot Pocket Card.  It's very fussy and fancy, but that is just how I like it!


Supplies:

Scor-Pal
Scor-Tape
Memory Box Heart Die
Memory Box LaRue Heart Die
Country Boutique by Fancy Pants
Wild Orchid Craft lace and flower

Start with a piece of card stock that measures 3 1/2" x 7 3/4", score at 3 1/4" (valley fold) and 6 1/2" (mountain fold).  Then fold as follows:


Next, I used a heart die from Memory Box for the "flower pot" part of my card.


I used a Scor-Tape Sheet and the LaRue Heart from Memory Box for the filigree pattern on the front of the heart.


Next I went crazy decorating with all sorts of hearts, some lace and ribbon and some sparkly paper!

Thanks for stopping by!

Lisa A.


Sunday, February 17, 2013

Split Coast Stampers Love Fest Challenge


Hi everyone!  Today Scor-Pal is participating in the Splitcoast Stampers Love Fest. We are hosting today's challenge which includes flips, flaps and oodles of folds. Be sure to stop by the Scor-pal forum for all the details and to join in on the challenges, chatter and fun!


My first card is a Z-fold card featuring Walter the Moose from Magnolia.  I also used Vine Frame from Memory Box.  The designer paper is from Simple Stories, its the Awesome collection.


My Next card is my version of a Criss Cross card.  It features a fold down flap with a pop-up element!

Supplies:

Princess of the Valley - Magnolia Stamp
Rose Scent Tilda - Magnolia Stamp
Tilda Loves Flowers - Magnolia Stamp
Fancy Pants Designs - Country Boutique
Memory Box - Heart Border
Copic Markers
Wild Orchid Crafts Flowers and Lace


Be sure to stop by and see what fabulous projects all the Scor-Pal Designers have come with!

Lisa A.

Monday, February 11, 2013

Activity Book


Hi everyone!  Today I am sharing with you an activity book that I created using The Portfolio Collection from Pink Paislee.  I was such a great collection to work with.  I just love all of the embellishments and chipboards!  My project is also being featured on the Scor-Pal Blog


Supplies:


The Portfolio Collection from Pink Paislee

coordinating card stock


Scor-Tape

white feathers

brads


First, start by cutting two pieces of card stock, the first one is 11" x 6", score at 5" and 6".  The second one is 7" x 6", score at 5" and 6".


Attach them together with Scor-Tape to create a book. Decorate the outside and the inside.


For the pouch on the inside, use a piece of 6" x 3 1/2" card stock and score at 1/2" and 1" on three sides, decorate and attach to the inside of your book.


To make the little booklets, I made two, the sheet of paper on the inside of the book measure 2 7/8" x 2 7/8".  The cover is 6 1/4" x 3", score at 3" and 3 1/4".  Place pages on the inside of the book and punch two holes for the spine.  I used baker's twine to tie them together.


I hope you enjoyed my project today!!  I had lots of fun making it!


Lisa A.


Look What I Made Using My Scor-Pal and Simple Stories!


Hi everyone!  I made a cute Desk Calendar using my Scor-Pal and the Awesome collection from Simple Stories.  You can also see my project on the Scor-Pal Blog along with other fabulous projects from the design team!


Supplies:

card stock
various brads
adhesive numbers
acetate
date stamps


To create the drawer, start with a 4 1/2" x 4 1/2" square of cardstock, score 1" on all sides to create the drawer.  Tip:  I decorate the drawer front and positioned my brad before I assembled my drawer.  Next, for the drawer wrap.  Start with a piece of cardstock 3" x 9", score at 1", 4", 5" and 8".  Create the wrap and place the drawer inside.


The calendar pages are 2 1/4" x 1 3/4".  I used a 1" and 3/4" circle punch for the calendar pulls and used coordinating brads for each month. 


Use the drawer to store the off months.  The easel card on top measures 2 1/2" x 5 ", score at 1 1/4" and 2 1/2".  I used a 2 1/4" square of acetate adhered with brads to slide the months into.  

Happy Scoring!

Lisa


Thursday, January 31, 2013

Winter Inspired Wrap Box


Welcome all!  Today I have a beautifully inspired winter wrap box to share with you that holds something to warm your insides.

Supplies:

Little Yellow Bicycle - Winterings
card stock
sliver glimmer paper
teresa collins Christmas cottage rhinestone medallion
Spellbinder pearl heart

Tools:

Scor-Pal
Scor-Tape
Martha Stewart punches
Memory Box snowflake die


To start, cut a piece of cardstock 5 1/2" x 5 1/2" and punch around the outside with a Martha Stewart border snowflake punch.  This is the dark blue base of the box


Create a box using a light blue piece of card stock measuring 8 1/2" x 8 1/2".  Score at 2" on all sides to create your box.  For the lid, cut a piece of light blue card stock 5 1/2" x 12".  With the long edge on the top fence, score at 4 1/2", 6 1/2" and 11".  Turn the paper so that the short edge is on the top fence and score at 1/2" and 5".  It should like the picture below.


Now cut as shown below:


Here is the lid and the base of the box:


Attach the lid to the box using Scor-Tape making sure that the bottom of the box is attached to the bottom of the lid piece on the outside.


Now we are going to create our "wrap" pieces.  Cut a piece of white card stock 3" x 12", punch both sides with a Martha Stewart snowflake border punch and a row of snowflakes using a Martha Stewart punch.  I used a contrasting piece of Little Yellow Bicycle Winterings paper behind the circle snowflakes. 


Attach one of the snowflake strips to the bottom, back and top of the box with Scor-Tape.


Attach the remaining snowflake strip to the bottom of the box with Scor-Tape, leaving the front edge and top free.  I hot glued the medallion to the top leaving the bottom half of the medallion free from hot glue.  This is where you tuck the other part of the "wrap" under.  Attach the box to the snowflake base we created in the first step.

Add a little something inside to warm you up on a cold winter's day!


I hope you have a wonderfully warm day!!

Lisa Andrews